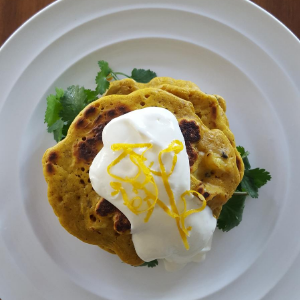
During lockdown, my daughter started her sourdough project and after a few trials and errors, her sourdough starter has been going strong now for a few months now. There is a regular stream of discard that comes with keeping a sourdough starter alive. This is not my own recipe but came across it in a Miele newsletter – I forgot to take note of the author!
These fritters are delicious – I served them for breakfast with some lemony Greek style yoghurt.
Cauliflower fritters
INGREDIENTS
1/2 head of cauliflower (about 400g)
2 tablespoons curry powder
2 tablespoons sunflower oil
2 eggs
220 ml milk
60 grams melted butter
180 grams flour
5 grams baking powder
2 grams salt
5 grams sugar
80 grams starter
To serve:
Grated zest from one small lemon
Coriander leaves
150ml Greek style yoghurt
METHOD
Chop cauliflower into small florets and cook in a fry pan with 2 tablespoons of sunflower oil until a rich coffee colour is evenly achieved.
Measure all dry ingredients straight into a large bowl.
Add milk and melted butter and mix straight away to avoid lumps. Then add starter, followed by eggs and mix until just combined.
Fold through the cooked cauliflower and curry powder.
Pan fry this batter in small batches on a pre heated non-stick skillet and serve straight away piping hot.
To serve: Place a sprig of coriander in between the fritters and top with Greek style yoghurt. Sprinkle the zest.
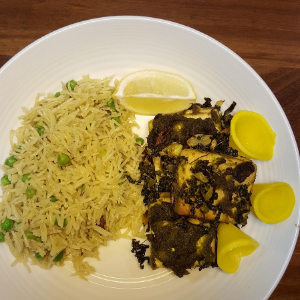
I make this spicy fish curry with monk fish but any firm white fish fillets would work. I can’t claim credit for this curry – I have adapted from Atul Kochhar’s “Simple Indian” cook book.
The curry goes well with plain steamed rice and a refreshing salad with cucumber, radish and carrots.
I could just about write a recipe book just on 100 ways with tofu as I am confident I can convert any tofu hater to a tofu convert!!
In some of my previous blogs, I wrote about my desire to render the same cooking method to vegetarian / vegan dishes as conventionally reserved for meat based dishes. This dish evolved as I was making a chicken version for the family and this vegetarian option for myself. My son actually preferred this tofu version so here is the recipe.
Roast tofu with kale and spring onions
If you don’t have firm tofu, press tofu amidst several layers of paper towel for 15-20 minutes. You do have to marinate the tofu for six hours and the roasting takes 45 minutes so it’s not exactly something you can whip up on short notice. Serve with steamed rice and a salad.
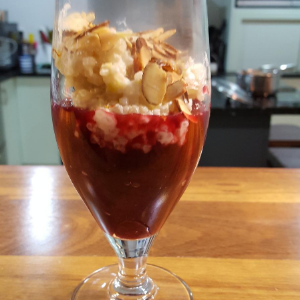
Rhubarb is a perennial vegetable but it is cooked like a fruit! When you think of rhubarb and associate with a pie, you are not wrong because the red stalks (part used) are generally paired with sugar, butter and flour!
Rhubarb, with its attractive pinkish red hue is a heavy weight in terms of nutrition value. It is high in fibre, Vitamin K and also has more antioxidant punch than kale! Some people therefore consider rhubarb as super food. I personally wouldn’t say that because it only becomes palatable if you add sugar to it so I would go as far as saying that it is a healthyish dessert choice!
Spiced rhubarb with sago custard
This is a lovely dessert and it is vegan! I guess you could also try sub rice for sago.
I have mentioned in some of my previous posts that I like to incorporate some protein element to my dishes to keep them nutritionally balanced. The logic is that if this is the only thing you are going to eat for that meal, you will feel satisfied and fuller for longer because of the fibre, protein and low glycaemic index of vegetables. Fennel is a versatile vegetable and you should try if you haven’t tried it before. You can roast it with beetroot for a roast salad or finely slice for a crisp coleslaw or is great in soup. Fennel also goes well with tomato and any white beans – you can make a soup out of tomato, fennel and cannellini beans.
Creamy leek and fennel soup
My recipe uses your pantry staple lentils, leek and fennel. The trick to washing leeks well is to cut them in half longitudinal and wash the layers with running water. Fennel the vegetable is mild but it lets you know that it has been used. It is not in your face flavour but in the same token it is creamy when cooked and does take on more flavours. Do give this soup a try because every time I make it, the bowls are licked clean and it is a no fuss recipe with few ingredients!
INGREDIENTS
1 leek, sliced thinly into half moons
1 large fennel or 2 medium sized (about 750g), chopped
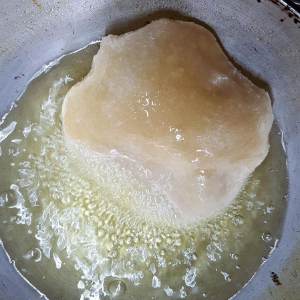
In India, pooris are often eaten for breakfast along with a potato preparation. What’s not to love about a poori that is beautifully puffed and deliciously light even though it has been fried in oil? My mother reminisces the time when she prepared the dough wanting to make rotis for lunch and had gone shopping. I must have been just about 10 years and I don’t remember it but I used that dough to make pooris for everyone instead of rotis! Such is the love for pooris in India, however these days it has become a very occasional treat.
For all my Indian breads I use atta that one can buy in the Indian store – it is not the same as wholemeal flour but personally feel atta is milled fine.
I am probably going to upset some people by saying that lawns are the biggest waste of resources – money and space mainly. I wonder why we are so obsessed with having a lawn when we can use that space to grow fruits, vegetables, herbs or even cut flowers and be a little bit self-sustainable. I have always been interested in gardening right from a very young age – but didn’t have the confidence to drastically convert the back lawn to an edible garden.
During lockdown, it felt really nice harvesting some spring onions, salad greens, feijoas and mandarins from our garden. My project took seed when I wanted to take it up a notch and challenge myself to growing more. The next step was reading about permaculture, urban farming and following some pro gardeners like Charles Dowding (No dig beds) and Mark Valencia (Self Sufficient Me).
Below are the steps I followed.
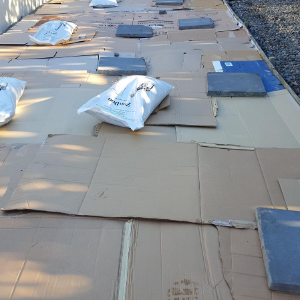
Cover the area with cardboard
Measure the area you have and monitor how much sunshine your designated patch gets. Note whether it is morning or afternoon sun. Most vegetables require between 6 -8 hours sunshine. The area I wanted to convert was about 80 square metres. My garden has a micro climate of its own because of the type of vegetation I have grown over the years – it is warm, sheltered to a certain extent from wind and frost.
Draw up plans on a piece of paper and colour in the details to see how it is going to look. Make a rough estimate of costs and budget. I wanted a mix of “no dig beds” and planter boxes. I did a drawing as this helped to conceptualize – great tool for evolution of that rough idea. Initially, my husband was going to build the planter boxes but then I found good quality ones I was happy with https://www.steelmates.co.nz/ They do come as a flat pack and requires about half an hour to assemble.
Consider how you are going to irrigate your beds. I love hand watering because it is a great time to reflect on life in general and also monitor the health of your plants. (You can think about collecting rain water in barrels). You can be vigilant to notice pests and diseases before they kill your precious plants.
I set up a compost bin so I get a regular supply of good quality compost for the beds. Compost takes three months! Last year I set up a worm farm and the worm tea /castings are a good source of organic nutrients for your plants.
No dig beds
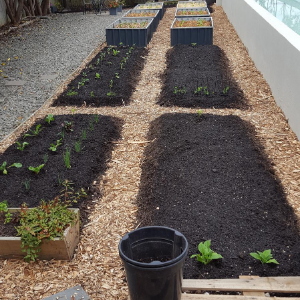
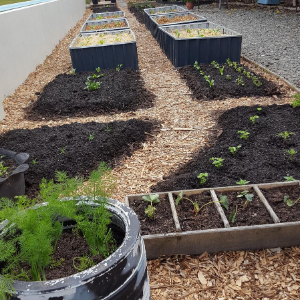
I ended up with six planter boxes about 1.75metres by 1 metre (approximately) and then 4 large and 4 small no dig beds. I decided to prepare the entire area as if I was going to do a “no dig bed”.
Raised planter boxes
If you want to be successful with an edible garden, it means you have to be committed to caring for the soil and the general environment. You improve the soil health by putting compost and such organic materials that will help build a rich medium for plants to grow. Good soil must be free draining and also retain enough moisture and water without becoming boggy. Free draining soil also has vital microbes and fungi that help the growing medium thrive. Getting good quality soil is the biggest expense/ investment. Like the name suggests with a no dig bed, there is no digging or tilling of the soil. First you get rid of the lawn by covering it in cardboard. You can pick up cardboard at a paper recycle station or ask at your local electronics, furniture store. Remove all staples, sticky tape and labels. Mow your lawn and then cover the entire area with thick layers of cardboard.
Wet the cardboard.
I used the compost, bark mulch from Zoodoo. They “harvest” the hoof poo from the zoo and convert to this rich compost and tub mix.
After placing my planter boxes in position, I used wood chip for paths. To fill the planter boxes efficiently, I used tree trimmings (from my garden and old leaves) as base material along with wet newspapers / cardboard. Then I filled with some coarse base (sold as forest floor at Zoodoo) and topped with bark mulch, compost and tub mix. I used the same formula minus the tree trimmings for the no dig beds.
Finally used pea / barley straw as mulch. Water well and let them settle for a couple of days before planting.
I wanted to break in the beds and so planted winter growing brassicas (broccoli, cabbage, cauliflower, kohlrabi, kale) for a late spring harvest and also some herbs and salad greens.
In terms of time, I estimate it took me about 150 hours in total. I did have some help from my family. I used just under 11,000 litres (11 cubic metres) of compost / soil / bark mulch combined which was about half the total spend on this project. I also used a cubic metre of wood chip for the pathways. I can say it is more or less complete and I spent about $4,000 to convert 80 square metres into an edible garden. I will keep you updated on good performers and what didn’t work so well.
I also wanted to mention that there were no sponsors – just recommended what I used because I was satisfied with the product.
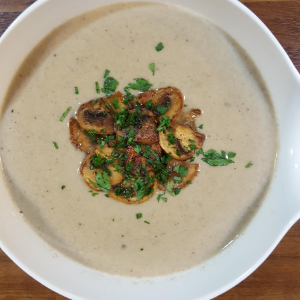
I know this is very retro – I loved mushroom soup in the ‘90s and now too. It is a lovely soup for a cold night or served with crusty bread, makes a great starter for your dinner party.
The flavour for this soup is enhanced by mushroom powder. I make mushroom powder by blitzing dried shitake mushrooms in a small spice blender. The mushroom powder is not limited to this soup – I use it to inject flavour into pies and pasta sauces.
Cream of mushroom soup
INGREDIENTS
60g butter
100g onion, finely chopped
3 garlic, finely chopped
800g white button mushrooms, any black bits brushed off
Pizza needs no introduction. From humble beginnings as peasant food in 17th century Naples, it is now one of the most popular and well known foods today. Store bought vegetarian pizzas are meh, so I love making my own pizzas from scratch and injecting tons of flavour at the same time not making the crust soggy.
I love this pizza dough recipe because you can freeze it or refrigerate overnight. You do need a stand mixer otherwise you need to manually knead the dough for over ten minutes. Normally I find kneading therapeutic so don’t use stand mixer for doughs that require shorter knead times! For the dough, best to use bread flour or 00 flour or any flour with a higher gluten content.
It is best to weigh out the water to be precise. Approximately one and a half cups of water makes up to the 350 grams of water needed for the dough.
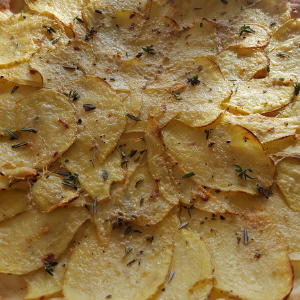
In Italy, pizza bianca means “white pizza”, which is a pizza drizzled with olive oil and salt and of course no tomato sauce. Sometimes topped with Mozzarella or Parmesan Cheese. We love to top our white Pizza’s with wafer thin slices of potato and herbs.
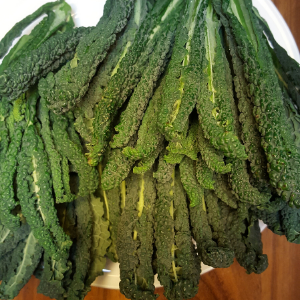
Cavalo nero has several other names. Lacinato kale in Italian, or black cabbage, Tuscan kale, Italian kale or dinosaur kale. Whatever the name, it is rich in iron, Vitamin K, A and C and like its other cousins, has more calcium than milk.
Cavalo nero
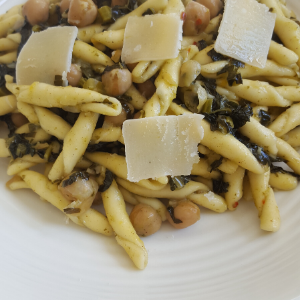
The sauce is fairly simple and quick to make, using only a few ingredients. I used parsley pesto but basil pesto should work. Also the cavalo nero is cooked well for 20 or so minutes, as recommended by Italian chefs. You can use casarecce or strozzapretti shaped pasta.