I have been a gardener for as long as I remember. Growing up in India, we grew an extensive range of vegetables (eggplants, beans, gourds and greens), fruits (guava, banana, mango and lemon) and flowers (gerberas, jasmines, solidago, zinnia and sunflowers). It was basic back in those days but we maintained a compost heap, made our own oil cake and cow dung tonic for the plants.
The beauty of gardening is that with a little effort and some patience you will be rewarded for your handiwork. You need some basic equipment and the rest you can manage with whatever is available at home. You can upcycle if you have the skills or do what I do just repurpose everything. For example, I go to a tyre shop and ask for old tyres – line them up with lots of old newspaper and fill it with potting mix and you have yourself a good space to grow vegetables. Cardboard boxes are also good to grow annuals or herbs. Drill some holes into an unused bucket and you have a pot!
When the weather is conducive, go and get yourself some seed packets or seedling punnets along with some potting mix or compost. I find it is best to invest a bit more in organic because not only do they improve your existing soil but also provide nutrients that last more than one planting. The plants require less watering as the soil has better moisture retaining capability. You will also need a liquid fertilizer like a sea weed tonic.
TIPS FOR SUCCESSFUL GROWING
Plant late evening so seedlings shock is reduced
Soak seedlings in seaweed tonic before transplanting – this makes them settle in faster in their new surrounds.
Spacing between plants is important – as a general rule of thumb, leave two hand spaces between plants.
Overcrowding causes plants to rot or they won’t have enough space to grow to full potential.
I am probably going to upset some people by saying that lawns are the biggest waste of resources – money and space mainly. I wonder why we are so obsessed with having a lawn when we can use that space to grow fruits, vegetables, herbs or even cut flowers and be a little bit self-sustainable. I have always been interested in gardening right from a very young age – but didn’t have the confidence to drastically convert the back lawn to an edible garden.
During lockdown, it felt really nice harvesting some spring onions, salad greens, feijoas and mandarins from our garden. My project took seed when I wanted to take it up a notch and challenge myself to growing more. The next step was reading about permaculture, urban farming and following some pro gardeners like Charles Dowding (No dig beds) and Mark Valencia (Self Sufficient Me).
Below are the steps I followed.
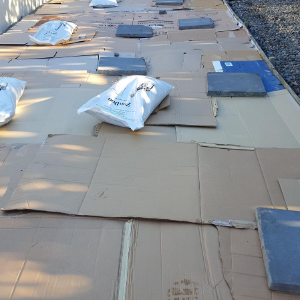
Cover the area with cardboard
Measure the area you have and monitor how much sunshine your designated patch gets. Note whether it is morning or afternoon sun. Most vegetables require between 6 -8 hours sunshine. The area I wanted to convert was about 80 square metres. My garden has a micro climate of its own because of the type of vegetation I have grown over the years – it is warm, sheltered to a certain extent from wind and frost.
Draw up plans on a piece of paper and colour in the details to see how it is going to look. Make a rough estimate of costs and budget. I wanted a mix of “no dig beds” and planter boxes. I did a drawing as this helped to conceptualize – great tool for evolution of that rough idea. Initially, my husband was going to build the planter boxes but then I found good quality ones I was happy with https://www.steelmates.co.nz/ They do come as a flat pack and requires about half an hour to assemble.
Consider how you are going to irrigate your beds. I love hand watering because it is a great time to reflect on life in general and also monitor the health of your plants. (You can think about collecting rain water in barrels). You can be vigilant to notice pests and diseases before they kill your precious plants.
I set up a compost bin so I get a regular supply of good quality compost for the beds. Compost takes three months! Last year I set up a worm farm and the worm tea /castings are a good source of organic nutrients for your plants.
No dig beds
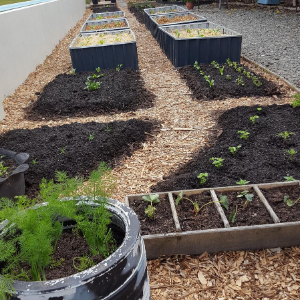
I ended up with six planter boxes about 1.75metres by 1 metre (approximately) and then 4 large and 4 small no dig beds. I decided to prepare the entire area as if I was going to do a “no dig bed”.
Raised planter boxes
If you want to be successful with an edible garden, it means you have to be committed to caring for the soil and the general environment. You improve the soil health by putting compost and such organic materials that will help build a rich medium for plants to grow. Good soil must be free draining and also retain enough moisture and water without becoming boggy. Free draining soil also has vital microbes and fungi that help the growing medium thrive. Getting good quality soil is the biggest expense/ investment. Like the name suggests with a no dig bed, there is no digging or tilling of the soil. First you get rid of the lawn by covering it in cardboard. You can pick up cardboard at a paper recycle station or ask at your local electronics, furniture store. Remove all staples, sticky tape and labels. Mow your lawn and then cover the entire area with thick layers of cardboard.
Wet the cardboard.
I used the compost, bark mulch from Zoodoo. They “harvest” the hoof poo from the zoo and convert to this rich compost and tub mix.
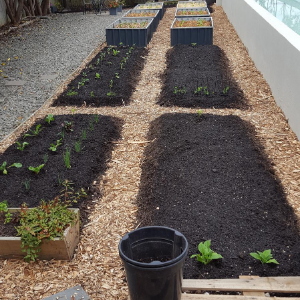
After placing my planter boxes in position, I used wood chip for paths. To fill the planter boxes efficiently, I used tree trimmings (from my garden and old leaves) as base material along with wet newspapers / cardboard. Then I filled with some coarse base (sold as forest floor at Zoodoo) and topped with bark mulch, compost and tub mix. I used the same formula minus the tree trimmings for the no dig beds.
Finally used pea / barley straw as mulch. Water well and let them settle for a couple of days before planting.
I wanted to break in the beds and so planted winter growing brassicas (broccoli, cabbage, cauliflower, kohlrabi, kale) for a late spring harvest and also some herbs and salad greens.
In terms of time, I estimate it took me about 150 hours in total. I did have some help from my family. I used just under 11,000 litres (11 cubic metres) of compost / soil / bark mulch combined which was about half the total spend on this project. I also used a cubic metre of wood chip for the pathways. I can say it is more or less complete and I spent about $4,000 to convert 80 square metres into an edible garden. I will keep you updated on good performers and what didn’t work so well.
I also wanted to mention that there were no sponsors – just recommended what I used because I was satisfied with the product.