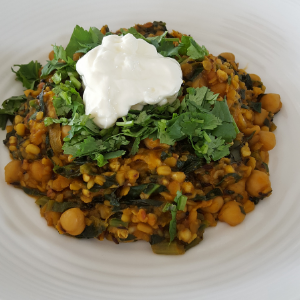
This is a flavourful, protein packed one pot dish that is plant based. When you eat this, it definitely feels like you are feeding your soul. You may need to get the urad dhal from an Indian grocer along with black mustard seeds. The urad dhal makes the stew thick and creamy.
Lentil, Buckwheat and Spinach Stew
INGREDIENTS
250g red lentils
50g urad dhal
100g buckwheat, toasted
250g tomatoes
1 tablespoon tomato paste
2 x 400g tin of chick peas, drained
200g onions, thinly sliced
1-2 green chillies, sliced thinly (optional)
7-8 centimetre piece of ginger, peeled and finely sliced
120g spinach, finely chopped
1 teaspoon cumin seeds
1 teaspoon black mustard seeds
½ teaspoon turmeric powder
4 tablespoons vegetable oil like canola
Coriander leaves, roughly chopped
Salt and pepper to taste
Greek style yoghurt to serve (optional)
METHOD
Dry toast the buck wheat for five minutes on medium heat until pale brown.
Heat oil in a large saucepan. When hot enough, add the mustard seeds and cumin seeds. When you hear them crackling, add the onion, green chillies and ginger and a teaspoon of salt. Fry on medium heat for seven to ten minutes until soft. Add the red lentils and urad dhal and continue frying for another 10 minutes on low heat.
Use a box grater and grate the tomatoes. When the mixture looks dry, add the grated tomatoes and juice. Continue frying as the lentils will absorb most of the moisture quickly. Measure out 2 cups of water – add half cup of water at a time and cook (with lid closed) for five minutes until the water is absorbed before adding another half cup. Spoon in the tomato paste, along with chick peas, toasted buck wheat and turmeric powder. Continue adding half cup of water in five minute intervals and cook for a further 12-15 minutes until the buck wheat is soft. Mix in the spinach leaves. Cover and cook for a further 30 seconds. Turn off heat, remove lid. This way the spinach will remain a vibrant green colour.
Taste and adjust seasoning to your taste. Stir in the coriander leaves.
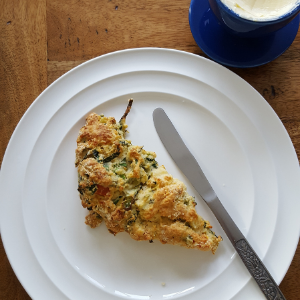
For a good scone, you need to have everything ready and not over mix. They are relatively easy and I like because they can be served for morning tea as well as lunch. Do try these as they are flavourful and delicious. I adapted this recipe from the Ripe café cookbook called Ripe Recipes – a third helping.
Broccoli & Spinach Scones
INGREDIENTS
160g broccoli, cut into large florets
340g plain flour
1 teaspoon salt
½ tsp baking soda
1 and a ½ teaspoons baking powder
1 teaspoon cumin seeds
1 teaspoon mustard powder
½ teaspoon cayenne pepper
100g unsalted butter, cold and grated
1 egg
125ml natural yoghurt
½ cup milk
40g spinach leaves, roughly chopped
1 spring onion, finely chopped
65g sundried tomatoes or fresh cherry tomatoes, roughly chopped
50g cheddar cheese
METHOD
Preheat oven to 200 degrees.
Place broccoli into a microwave safe bowl with a tablespoon of water. Cover and microwave on high for a minute. Remove, shake and return to microwave for a further minute. Drain and when cool enough to handle, finely chop the broccoli and set aside.
In a large mixing bowl combine the flour, salt, baking soda, baking powder, cumin seeds, mustard powder and cayenne powder. Add the cold grated butter and using your fingertips, rub it into the dry mix until it resembles fine breadcrumbs.
In a small bowl, lightly whisk the egg, yoghurt and milk together.
Tip the dry ingredients onto a clean work bench. Make a well in the middle of the flour. Add the egg mixture along with the broccoli, spinach, spring onion, tomatoes and cheese. Use a butter knife and cut the liquids and vegetables into the flour until just combined. Do not worry if there are small unmixed lumps.
Transfer the dough onto a lightly floured baking tray. Pat the dough into a rectangle that is approximately 2 centimetres high and cut into 8 triangles.
Separate the scones out a little so they have room to rise. Brush the tops with a little milk and bake for 15 -18 minutes or until cooked through. Serve warm.
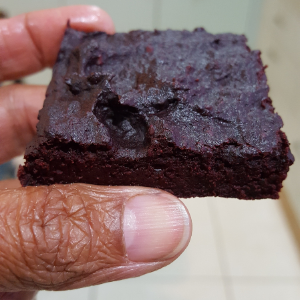
I know the name is intriguing and yes the main ingredient is beetroot. This is a guilt free treat – just five ingredients and plant based. It is easy to make so definitely give this recipe a try. Boiling the beetroot does take time and the brownie is only as nice as the quality of your chocolate. Buy the best you can afford with at least 60% cocoa.
Beetroot Brownie
INGREDIENTS
450g beetroot
200g dark chocolate
½ cup plain flour
½ cup ground hazelnut powder
½ cup brown sugar
METHOD
Preheat oven to 180 degrees Celsius. Line a shallow 22 centimetre square baking tin with baking paper.
Top and tail the beetroot. I like to boil beetroot (whole), uncut and unpeeled so the colour does not run. Once boiled, cool and peel. Cut into pieces and puree well using a blender.
Melt chocolate in a microwave safe bowl.
Mix the pureed beetroot in to the melted chocolate. Add the remaining ingredients. Pour mixture into the prepared tin and bake for 20 to 25 minutes. Switch the oven off and let it sit in the oven for a further five minutes.
Allow to cool in the tin before slicing. You can serve with cream or ice-cream or I love it on its own.
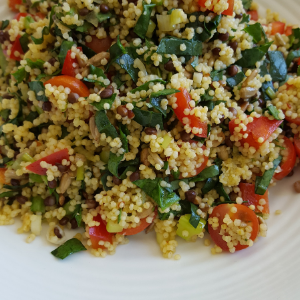
We are a family of picky eaters – for starters, we are fairly healthyish and want loads of protein and vegetables in each meal. We sway towards naturally gluten free food and personally prefer vegetarian food. The family want nutrient dense food that is not bulky and it needs to look good and taste even better. I would like one pot meals if possible and do it in a minimum amount of time especially during summer, as I would like to spend more time tending to the garden. It is a tall order and I created this recipe for weekday lunches as it ticks all those boxes!
Millet salad
INGREDIENTS
1 cup of millet
400g tin of beluga lentils, drained and rinsed well
100g of tender spinach leaves, washed and finely chopped
200g cherry tomatoes, cut in half
2-3 spring onions, washed and finely diced
1 red pepper, core removed and finely diced
150g sunflower kernels, dry roasted
2-3 sprigs of coriander leaves, washed and finely chopped
1 pinch of turmeric powder
For the dressing:
2 tablespoons lemon juice
1 tablespoon apple cider vinegar
2 tablespoons good quality extra virgin olive oil
1 teaspoon Sriracha sauce or sambal oelek
Freshly ground black pepper
Salt to taste
METHOD
In a sauté pan, toast the millet on medium high heat for five minutes. Add 370ml water to a saucepan and a pinch of turmeric along with half a teaspoon of salt. Mix in the toasted millet and cook on low heat for 15 minutes.
Measure all the dressing ingredients into a jar or a bowl and whisk well.
Once millet is cooked, add the spring onions and spread out the millet to cool on a platter or large bowl. Pour the dressing and mix all the other ingredients. Adjust seasoning to suit your taste.
This is a super quick and easy stir fry recipe that is delicious. When I am short of time and can’t think of what to prepare for dinner, I choose this recipe as it is one of our family favourite.
Stir-fry chicken Hyderabad style
INGREDIENTS
400g chicken thighs, cut into bite sized pieces
4 tablespoons lemon juice
200g onions
3 tablespoons vegetable oil
3 centimetre piece of ginger, peeled and roughly chopped
4 cloves of garlic, peeled and roughly chopped
1 teaspoon cumin powder
1 teaspoon coriander powder
1 teaspoon garam masala powder
½ teaspoon chilli powder
¼ teaspoon turmeric powder
1 green pepper, remove core and cut into chunks
Salt to taste
METHOD
Place the cut chicken pieces in a glass bowl. Stir in the lemon juice. Mix well, cover and allow to marinate for one hour.
Quarter the onions and separate the layers.
Using a mortar and pestle, crush the ginger and garlic to a paste.
Heat a tablespoon of oil in a deep frying pan (kadai) or a wok. Remove chicken pieces from marinade, discard the lemon juice and fry the chicken pieces on one side for 2-3 minutes. Remove to a bowl and set aside.
Add remaining oil and fry the onions, ginger and garlic paste. Stir frequently over medium high heat for 3-5 minutes until the onions are a pale golden colour. Put the cumin and coriander powders along with turmeric, garam masala, and chilli powder. Season with salt and if the spices are sticking to the bottom of the pan, sprinkle a spoonful of water. Fry the spice powders for a minute.
Toss in the green pepper pieces and increase heat to a high. Fry for a minute and add the chicken. Fry continuously for 5-6 minutes, until chicken is well cooked.
I started experimenting with quinoa long before it became trendy and when I didn’t know better, I did call it ‘kweenova’. Now everyone knows to say ‘keenwah’. However you say it, the nutritional benefits of this pseudo super grain remain the same. It is a pseudo grain because it is a seed from a plant and not a grass like oats, barley or wheat. One cup of cooked quinoa gives you 8g of complete protein as it contains all the nine essential amino acids. It is also naturally gluten free and rich in dietary fibre as well as iron and B complex vitamins.
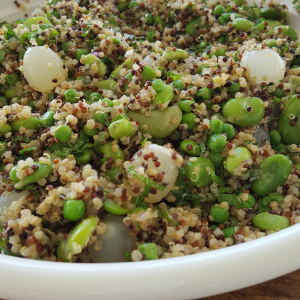
TRICOLOUR QUINOA SALAD WITH PEAS, EDAMAME & BROAD BEANS
There are about 120 varieties of quinoa but most commonly available are white, red and black. I used the organic combo and found it to be fluffier and nuttier than just the white ones.
INGREDIENTS
1 cup organic tricolour quinoa
150g shelled edamame beans (frozen)
200g green peas (frozen)
250g broad beans (frozen)
200g pickled cocktail onions, drained
Handful fresh mint leaves, finely sliced
For the vinaigrette
Grated zest of one lemon
30ml red wine vinegar
50ml good quality extra virgin olive oil
½ teaspoon sugar
Salt and freshly ground black pepper to taste
METHOD
Dry toast the quinoa in a non-stick pan on medium high heat for five minutes. Transfer quinoa to a sauce pan and add 400ml water. Bring to the boil, stir, reduce heat and cook for 15 minutes. At the end of cooking time, fluff up the quinoa and let cool to room temperature.
Prepare the edamame beans, peas and broad beans as per instructions on the packet.
Prepare the vinaigrette by mixing all ingredients except oil together. Gently whisk in the oil after the salt and sugar are more or less dissolved.
In a mixing bowl, mix the peas, broad beans, edamame beans and cocktail onions with the cooked quinoa. Stir in the vinaigrette and transfer to a serving platter. Just before serving top with the finely sliced mint leaves.
This is a universally appealing dip of Lebanese origins. The smoky flavour goes so well with pita bread. I am a bit of a food history buff and always wonder about the origins if I find similarities to a classic well known dish. In India, they make baingan bartha and there are regional variations too. I love the smell of charring eggplants on the open flame. The Chinese also do something similar and it is called Huo Shao Qie Zi. I guess it just goes to show that people travelled and shared their culinary heritage.
Roasted eggplants ready for making babaghanoushBabaghanoush
Making your own flat bread is so easy and the reason I started experimenting was because I wanted to cut down on plastic bags. I know it’s not much but one less bag is one less bag in the landfill.
Homemade Pita Bread – Stove top
This is a recipe from zero waste chef – Anne Marie Bonneau. I didn’t want to turn on my large oven for just this one thing but even on stove top, they are incredibly soft and moreish. Normal bread making is an exact science but I think you will find pita bread is more forgiving with relaxed measurements!
INGREDIENTS
380-390mls warm water (about 42 degrees C)
1 and ½ teaspoons sugar
2 teaspoons salt
3 tablespoons olive oil plus more for greasing the bowl and for frying if cooking pitas on the stove
1 packet instant dry yeast (7g)
3 and ¼ cups all-purpose flour, divided plus more for rolling out dough
I got inspiration for this dish from a meal I ate recently at St Clair Vineyard Kitchen and the chef prepared seasonal garden vegetables with carrot puree and buckwheat.
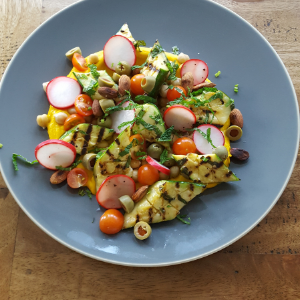
GRILLED ZUCCHINI & CHICK PEA SALAD WITH CARROT HUMMUS
If you want to showcase summer produce, this is the perfect dish. It makes for a very attractive and satisfying first course or you could serve this for a light luncheon with a cake for after.
INGREDIENTS
4 medium zucchini (150 g each) cut in half lengthways
Just wanted to put it out there that you don’t need a large section to be able to grow some of your produce. Depending on the size of your family and what you like to eat, you can have a very productive garden in a limited space. All you need is an interest and a will to grow.
I have significant garden space but like all gardeners, I too want to maximize space. I have set up container gardening on my patio and it is so nice to be able to literally see my vegetables grow in front of my eyes.
I have eggplants, grafted tomatoes, bush beans and cucumbers amongst other stuff. I also have a fig tree, a dwarf peach tree and a blueberry bush in containers. With all container gardening, you must water every day and if in a terracotta pot, perhaps twice a day. When filling your container, use good quality potting mix with a slow release organic fertilizer and water crystals. Also mulch the surface to prevent moisture loss. All summer vegetables need at least 6 hours sunshine and temperature in the mid 20’s. They are hungry crops and big feeders! Water, feed, harvest, repeat!
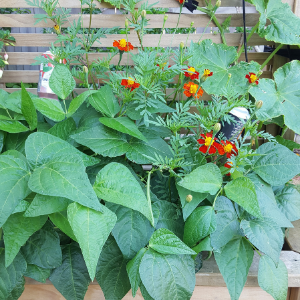
Marigolds are good companion plants for bush or dwarf beans
Bush beans or dwarf beans are very easy to grow. They germinate in a week and from seed to harvest in about two months. To make harvesting easy, plant bush beans in a raised bed, close to the edge so the beans kind of hang out and you can see them. Make sure you plant 10 or so plants so you get a good weekly supply through the season.
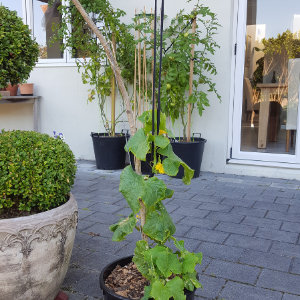
Training cucumber up the pergola
Grow your cucumbers vertically – this way they occupy less space. I am growing mine onto the pergola. Trim the bottom leaves and gently nudge the vine along to grab onto a pole or stake.
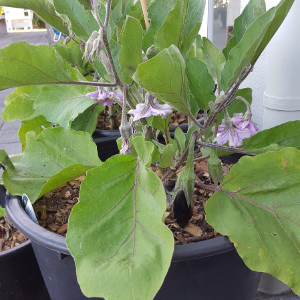
Grafted eggplant
This year I have planted grafted eggplants and tomatoes for the first time. The eggplants are full of flowers and look very promising. Grafted really helps in these coastal temperate zones where summers can be short. Eggplants need at least five months of warm sunny days to bear fruit and grafted reduces that time down to half.
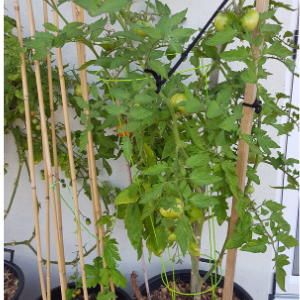
Grafted big beef
I have a cherry and a big beef tomato. I have Oxheart and Andiamo and different kind of cherry tomatoes in the beds. The cherry tomato has outgrown the cage and I have done a rough weave to help it reach the pergola.
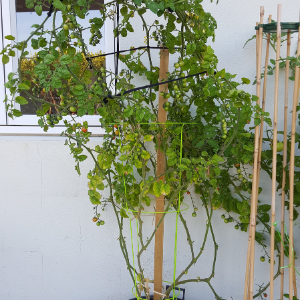
Training the cherry tomato up the pergola
Here are some growing tips for healthy tomatoes.
Snip the laterals regularly. Laterals are the little leaves that appear up the stem of your tomato plant. Pinching off laterals will allow the trusses of fruit to develop better, and promotes better airflow.
Tomatoes need full sun and love to be watered. They need to be well watered so that they don’t dry out. The more you water your tomatoes, the juicier your fruit are going to be.
Tomatoes are super hungry plants. Every couple of weeks, give them a good boost with some fertiliser in the watering can and you’ll be good to go for the season.
Remove bottom leaves – as your plant begins to grow, it no longer requires the bottom leaves. They tend to rot, so best to remove.
Blossom end rot – the three dreaded words when you are trying to grow tomatoes. The spot on the fruit where the blossom once was marks the centre of blossom end rot. Typically, the problem starts on the first flush of fruits and those that haven’t quite reached their full size. The spot appears watery and yellowish brown at first and will grow until it destroys much of the fruit. Other vegetables like eggplants can be subject to blossom rot as well. What blossom end rot is telling you is that the fruit is not receiving enough calcium, even though there may be ample calcium in the soil and the plant’s leaves.
Consistent watering is key. Remember to never ever water from above, but always water tomatoes at ground level. You may want to place some organic mulch around the plants to retain moisture. Tomato end blossom rot will usually affect the first round or two of fruits. Although blossom end rot can leave the plant vulnerable to disease, it is not a contagious condition and won’t travel among the fruits, so unless you find you have a severe calcium deficiency, there’s no need for sprays or fungicides. Removing the affected fruit and continuing with a consistent watering schedule may clear the problem for the fruits that follow.